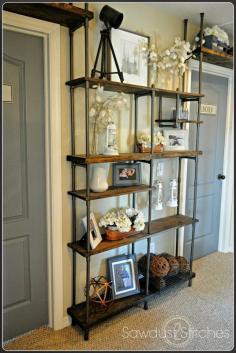
Budget industrial shelf using PVC Pipe..... Tools Required: Rubber Mallet Sand Paper Saw (I would suggest a Miter Saw) Drill 1″ Paddle Bit Sander (Suggested) Materials Needed: Spray Primer Metallic Spray Paint Stain 2×10 wood planks (Amount varies by project size) 3/4″ PVC pipe (Amount varies by project size) “T” PVC Joints (Amount varies by project size) P.V.C. pipe is AWESOME. Why? It’s cheap! Adaptable to nearly any space or design. Again, it’s cheap! (In my book that should count twice.) Overall this is a fairly inexpensive, easy do-it-yourself project! Bad news? You will need to create your own personal blueprint to accommodate your space. This project is about 75% prep work… Step 1: Think it through Take the time to map out your dimensions! Unfortunately the whole “measure twice, cut once” logic applies. Once dimensions are established you can get started! Step 2: Sand Using a piece of “fine” grit sand paper scuff up the entire exterior of the PVC pipes, joints, and elbows. Step 3: Cut Using a miter saw cut the PVC down to predetermined measurements. Step 4: Prime I began by putting together my brackets. (It’s easier to spray them this way.) When priming I HIGHLY suggest using a gray spray primer. It quickly and evenly coats the pipe. Added bonus: Since it is already primed a darker color, it will make top coating much easier. Step 5: Paint I used Rustoleum’s Oil Rubbed Bronze. (Remember several light coats, as opposed to one heavy coat. This way you avoid drips!) Next, exercise patience and let it dry COMPLETELY. Step 6: Prep Wood Planks While the PVC pipes are drying, get started on the wood plank shelves. For the shelves I used 2×10’s, in varying lengths. (You will need to adjust the length of the shelves to fit your own needs.) I used a 1″ paddle bit to drill holes that would allow the PVC to fit through it. Step 7: Sand and Stain Wood Planks Sand the boards and then stain them. (I used Jacobean by Minwax.) Step 8: Assemble! This was my favorite part, assembling the puzzle! This is when your blueprint will come in handy. Slowly but surely it started to come together. Might I suggest using a rubber mallet? Sometimes making the pieces fit together required a little “finesse.” Final step: Breathe easy, you’re done! I love that it is totally and completely customized! It creates that old-meets-modern feel of the industrial pipe shelving for a fraction of the cost!
